Friday, December 15, 2017

Meter Exploration

Lesson #10: Name that Meter

Today was my last lesson with my Spanish Oaks Elementary third graders! For our last lesson, I decided to use a lesson plan from one of my professors at BYU (Rob Dunn). He taught this lesson to our class and I loved it! I was very curious how this lesson would go with non-college music majors. So I taught it to this wonderful class and learned a lot! 

First, each student received a tennis ball (after going over the rules for the tennis balls). Then I directed the students to bounce the tennis balls in unison to form a common beat. They discovered this was hard. Simply bouncing the ball and catching it was harder too than I expected! Then we sang "Mary Had a Little Lamb" and bounces the ball to the beat. This was much easier--because there was a beat to follow that we were all listening to.


I demonstrated bouncing the ball on the floor (beat 1) and then catching it (beat 2). I drew visuals on my whiteboard that looked like this.

12       12       12       12

The students recited this with me and bounced their tennis balls in a 2 pattern.
This later turned into strong/weaks--like so:

Sw       Sw      Sw     Sw


This is an example of meter. Meter can be defined as: the regular groupings of strong and weak beats. The meter that has groupings of 2 is called duple meter.

We also learned triple meter! Instead of just the down-catch, down-catch pattern students now do down-catch-catch, down-catch-catch.

123      123    123    123

Sww     Sww   Sww    Sww

Then we listened to a bunch of different recordings of songs and bounced the tennis balls with the meter of each song. At the beginning, I told the students which meter it was in and also tapped the beat on my fingers so they could see the beat. Towards the end of the lesson, I tapped the beat but did not immediately tell them which meter the song was in. On average, about 3/4 of the class correctly figured out which songs were in 2 and 3.

If the song was slower, we could stand and bounce the tennis balls. If the song was faster, than it was easier to sit/kneel down and bounce from there.


Here's some of the songs we listened to that will be familiar to most people (if not by title, then by listening):

  • Pachebel's Canon in D (2)
  • Rossini's William Tell Overture (2)
  • Copland's Variations on a Shaker Hymn (2)
  • Copland's Rodeo: Hoe Down (2)
  • Ravel's Bolero (3)
  • Tchaikovsky's Waltz of the Flowers (3)
  • Star Wars Main Theme (2)
  • Pirates of the Caribbean (3)
  • Polar Express (2)
  • Spider Man (2)
  • Lord of the Rings (4)
    • We briefly learned compound duple (4). (Down, catch, catch, catch)
This lesson was slightly crazy but fun! The kids were able to listen to a wide variety of music and to improve their listening skills while listening for strong and weak beats.

So Long, Farewell

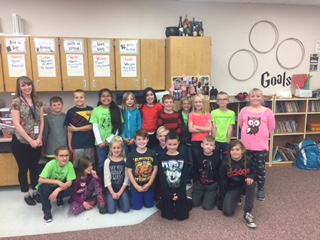
Teaching in this classroom has been one of my favorite experiences I've had while at BYU. Each of the students also made me their own thank-you cards! They are so sweet. I'm grateful for the opportunity I've had to teach them and for all that they have taught me this semester.

Saturday, December 9, 2017

Dividing Music

Lesson #9: Learning about Form


Yesterday we had another fun lesson at Spanish Oaks Elementary! I had decided that we would do another listening lesson. Listening to music is a skill that can be learned and improved! The class will also soon begin division. So this lesson focuses on form--how we can divide up a song into sections. 
I began by drawing this candy bar on the whiteboard. You were lucky enough to be given a KitKat, but you also have three friends with you who want to eat it too. You are a pretty generous person, so you divide the KitKat into four sections--one for you and each of your friends. But you don't just divide it anywhere--you follow the grooves that are part of the KitKat. So just like this KitKat was divided, we were going to divide a song into sections.


Form Piece


Then the class listened to a creation I had made called a form piece. This essentially is a combination of songs put together that leads to a very basic understanding of form. Before listening to this song, I directed them to raise their hands high when they heard a new section. HINT: the sections would be REALLY obvious.


We listened to the form piece, the students raised their hands at new sections, and there were a lot of laughs from the class. Then I drew a dot on the board. This dot represents the start of the piece. Then I drew an arc and asked the class what was the very first song they heard ("Be Our Guest"). I wrote the title beneath the arc and then drew a second arc ("Do You Want to Build a Snowman"). Next I explained that letters were going to represent these sections. The first section is A. The second section, because it is very different than the first section, is B. After listening to the song again, the class helped me draw and label the rest of the arcs. They caught on to this idea much quicker than I expected! 

After it was all written out, I explained that we divided this song into seven sections and discovered the FORM of the piece. The form of this piece was ABABCDA.

Round Two


Next we did almost the same activity, but with a real song! We used "All Star" by Smash Mouth (famous mainly because of "Shrek").


We did arcs and labelled the first half of the song. When the class wasn't sure of an answer, we went back and listened to the song again to check. 

Round Three


For this last song, I had students vote to pick a song they wanted to do. We ended up with "Moana." This round was to be a game! For the first listening, the class raised their hands at ends of sections and I drew arcs. The students had whiteboards and then copied the arcs I had drawn onto their whiteboards. They then had two more times to listen to the song and write in the letters. While the song played I pointed at the arc that we were in as the song progressed. 


The students had a minute or so (we were running out of time) to wrap up. I walked around and looked at their whiteboards. The first half of the song, I think every student got right (ABC). The second half was where answers started varying. I gave one freebie answer in the second half of the song that the class was struggling with.

When time was up, I wrote the correct form on the board. Then the students counted up the number they got right and then added their number with the other members of their house. The house with the most points won! Ravenclaw won! The form of this piece was ABCABC.

Wrap-Up


This was a fun listening lesson! I really was surprised at how well the students not only heard the sections but also how they caught on to labeling sections with letters and those letters repeating when those sections came up again in the music. I hope that they can now spot more of this in their own music-listening outside of the classroom!


Saturday, December 2, 2017

Dance of the Sugar Plum Fairy

Lesson #8: Musical Tradition


The Spanish Oaks third grade class had a fun time yesterday with this lesson! We began by discussing what a tradition is. The students gave many examples of various Christmas traditions their families have. We established that a tradition is a type of custom that is repeated over time. Traditions have meaning to us, often have some kind of order, may evolve over time, and we sometimes aren't happy when traditions are abruptly changed.

We then talked about some musical traditions. For example: singing "Happy Birthday" at a birthday party, singing patriotic songs around a national holiday, singing church songs at church, and so forth. 

Music as a Tradition (Music History Time):


When people first began writing music, there were all kinds of rules that governed how to write a song. Certain notes could be played together and other notes were avoided. Songs had a specific order (or form) to them. Certain kinds of songs were either sacred or secular. As I explained all of this (on a very simple and general level) to the students, I drew on the board a mini-time line. I drew a box for the 1600's and earlier, for the 1700's, 1800's, 1900's, and 2000's. Each of these different time periods had some different musical "rules" or traditions that composers followed up to the 1900's. But in the 1900's composers got sick and tired of following all the old rules about writing music! So they wrote whatever they wanted. Nowadays in the 2000's we hear music from all of these periods. New music written today is based at least somewhat in musical rules that have been taught in the past.

An Arrangement


I then wrote the word "arrangement" on the board. The students first defined the word in terms of "a flower arrangement" and then applied that knowledge to what a musical arrangement might be (a different version or assembly of a song). In class we would listen to an original song and then an arrangement of the same song.
  • Original song: "Dance of the Sugar Plum Fairy" from "The Nutcracker" by Tchaikovsky, written in the 1800's
  • Arrangement: "Dance of the Sugar Plum Fairy" sung by Pentatonix, written in the 2000's

Listen, Listen, Listen:


Most of the students immediately recognized this song when they heard it. I gave each student a scarf and modelled how I wanted them to use their scarf whenever they heard a specific melodic motive (the quickly descending wind instrument, or bass voice). The students caught onto this quickly and listened to the whole piece, using their scarf to show when they heard that motive.

Next we listened to the whole song again. This time the students were instructed to move their body to the sound of the music. Move their feet, legs, hands, arms, head, and scarf. If the music was quiet or loud, they should do something with their body that reflects that. If the music is sharp, smooth, fast, or slow they should show that with their body.

We did this activity! Most of the students got pretty into it!


After the song was over, the students sat and got to listen to the Pentatonix arrangement. They still did the same motion with their scarfs, but nothing else. They were to raise their hand whenever they heard something musical that was different in this recording. They were very enthusiastic in noticing that they heard something different.

Next we listened to the Pentatonix version again and the students moved around like they did with the original orchestral piece. 


Then we gathered again and had a class discussion about what was similar and what was different between the two recordings. We also talked about why we would write arrangements anyways when we have the original song. Each of the students had insightful observations that showed how they had been active and critical listeners while listening to the two pieces.

Monday, November 20, 2017

Native American Indians

Lesson #7: The Hand Game

This third grade class at Spanish Oaks Elementary has begun learning about different kids of cultures. One group of people they have been learning about is the Native American Indians. During this lesson we learned more about the culture of Native American Indians and played a traditional Native American Indian game.


Native American Indians: An Umbrella Term


First I explained to the class how the term "Native American Indian" is a very broad term and there are many more specific classifications underneath that term. I related this to shoes. Shoes are a very broad term. There are all sorts of different kinds of shoes--sneakers, sandals, boots, flip flops, heels, flats, slippers, and so forth. There are also many different kinds of Native American Indians--Navajo, Ute, Apache, Cherokee, Inuit, and so forth. I brought with me a library book about Native American Indians. This book listed some of these different tribes and showed a map with where these different tribes lived in North America--along with what kind of houses each of these different tribes built to live in. The book also contained illustrations of a Native American Indian's culture and lifestyle. There were pages about clothing, housing, hunting/farming, and transportation (canoe, horses, and dogsled). We looked at these pictures as a class and talked about some of these differences between our culture and their culture.

Native American Indians Played Games Too!


We also discussed as a class games that we like to play in our culture (such as monopoly). Well, the Native American Indians also played games--just different ones than we play now. I showed them a picture in the library book of some Native American playing cards and some sport (kind of like lacrosse) that some people were playing. The kids next got the opportunity to play a traditional Native American Indian game--called the Hand Game (also called the stick game). This game was played among Indians in the plateau region. I taught the game to the class (with some revisions in the rules that allowed every student to play at once and also that made the game simpler) and then we played it several times. This game was also played with musical accompaniment. Players would sing and also play the drums as part of the game. I taught the class a simple children's song that we would use for our musical accompaniment. The rules are as follows.


The Hand Game


1. The class is divided into two teams (Team 1 & Team 2). Each team forms two rows, facing inwards. Each row had about 5 students. The inside rows sit on the floor while the outside rows stand.
2. The first student in line (in the standing row) is the Team Hider. When it is their team's turn, the Team Hider will be given a button by the teacher. The Team Hider will then walk up and down their team's row and will hide the button in one of their teammate's hands (all the students standing have their hands outstretched behind their backs). 
3. The first student in line in the standing row on the other team is the Team Guesser. While the other Team Hider is hiding the button, the Team Guesser stands in the center and watches. After the button has been hidden, the Team Guesser has two guesses as to which student is holding the button. If the Team Guesser guesses correctly, that button goes into their team bowl (they score a point). If the Team Guesser is unable to locate the button after the two guesses, the other team puts the button in their own team bowl and gets a point themselves.
4. The Team Hider does have a time limit for hiding the button. The students who are standing are sing the children's song we just learned as a class. The inside rows of students who are sitting on the floor each had a different drum and a mallet. They drummed the beat of the song while the other students sang. The Team Hider had until the end of the song to hide the button.
5. Whichever team had the most buttons in their bowl when it was time to stop playing (which was decided by me) won!

The kids had a fun time playing this game. Halfway through the game, the kids playing the instruments switched with the kids who were standing. So everyone got the chance to play an instrument and almost everyone got the chance to be either the Team Hider or the Team Guesser. It was a fun time! Team 1 won. :)


Wrap-Up


I wrapped up the lesson by explaining that while Native American Indians back in the day did not have access to Monopoly, air conditioning, cars, plumbing, etc. But there are many Native American Indians today who do have access to those things. They do not necessarily wear tribal clothes all the times, and they're pretty similar to us. We just might differ in religious beliefs. I then showed the class some pictures. My Grandma and Grandpa Smith served an LDS mission at the Havasupai Indian Reservation at the bottom of the Grand Canyon. My Grandma was kind enough to send me some pictures of the people there, and I showed two of these pictures to the class--one picture of a Native American Indian boy and one of a Native American Indian girl. When I showed them to the class, one girl exclaimed out loud exactly what I'd hoped they would understand. She said, "They look just like us!" This was a fun lesson where the class got to explore more of Native American Indian culture, got to learn a simple song, play the beat with a mallet on a drum, and got to play a fun Native American Indian game!

Saturday, November 4, 2017

Latin American Instrument-ing!

Lesson #6: Welcome, Senor Don Gato!


Yesterday I took another trip to Spanish Oaks Elementary! The kids are beginning to learn about cultures: what a culture is, what makes up a culture, and so forth. Some specific cultures they'll be learning about include the Mayans, Aztecs, Incas, and Native American Indians. I knew that the kids loved playing instruments in one of our previous lessons, so I decided to organize our class time around instruments used in Latin America.

Story Time:


First I began by reading a children's story about a cat named Senor Don Gato. I explained that Senor Don Gato lives somewhere in Latin America--probably Mexico. The story follows Don Gato as he receives a love letter from a lady cat, then falls off a roof and breaks all sorts of bones, dies, is carried away to the cemetery, but then upon smelling fish, comes back to life! After reading the story, we pointed out things as a class that are different in this culture than in our culture (clothes, houses, food market).

Next I explained that other cultures listen to different kinds of music and use different instruments in that music. In our American culture we hear lots of piano, drums, and guitar (to name a few) in our music. Then I brought out some old Aztec instruments--an ayoyote (like a rattle) and an ocarina (a little instrument you blow in). There also was an African djembe (d rum). I then compared these to some other instruments I had brought from the BYU Elementary music library--a hand drum, claves, recorders, maracas, guiros, and cowbells. I explained that instruments evolve over time through different cultures and time periods--an example being of how the invention of the organ later led to the harpsichord which then led to the piano. So these really old Aztec instruments (among plenty of other instruments) over time have evolved to instruments like these!

Soundtrack for Don Gato:


Then we created a little soundtrack for just one of the segments of the story--when Don Gato is so excited about his love letter that he falls off the roof and breaks his ribs, his bones, and his whiskers! I wrote out this portion of the book on the white board. The kids had instruments at their desks and helped to decide when each instrument would play while the poem was being read. We created a kind of composition using different symbols above the text to represent different instruments would play (and sometimes if the instruments would play loudly, slowly, quickly, etc). 


Don Gato is a Song Too:


This little story isn't just a poem in a book. It's also a song--a ballad to be exact (a song that has many verses that repeats over and over to tell a story). I showed the class the last page in the storybook--which shows the written notation and sang it for the class. Then I pulled up a YouTube instrumental recording of the song and explained the students would be playing their instruments along with the recording (while I sang--all the recordings I found with singing were either creepy or annoying). First we practiced playing together as a class (they play when I clap). They didn't know, but we clapped a half note pulse, then a quarter note pulse, and then a quick clump of three eighth notes at the end of each phrase. The recording plays all six verses and the kids had to watch me each verse to see which rhythm we were going to do for which verse. We did the whole song once, switched instruments, and then did it again! The kids got pretty good at following me and enjoyed getting to experiment with these Latin American instruments!


Saturday, October 14, 2017

Marvelous Music Map Making!

Lesson #5: Sally Go Round the Sun


Yesterday I made another visit out to Spanish Oaks Elementary! Our lesson today was centered around the short and simple song "Sally Go Round the Sun." I was taught this lesson by Dr. Brittney May in one of my Music Education classes at BYU. So instead of being the student, this time I was the teacher!

Song + Movement

The students gathered in as large of a circle as the classroom would permit and I taught them this song. The lyrics are:

Sally go round the sun,
Sally go round the moon, 
Sally go round the chimney pot
every afternoon--boom!

After singing through the song once, I picked three students to stand in the middle of the circle. Each student held a piece of paper with one of the objects in the song drawn on it (a sun, a moon, a chimney pot). I sang the song and while I sang, walked around each student (going "round" the sun, moon, and chimney pot). When I got to "boom!", I was standing back in my original spot in the circle of students. 

Next the students got to sing and move along with me. I chose children by birthday months to make sure everyone got a turn in the middle.

Mini-Preposition Lesson:

Next I suggested to the class that maybe we could substitute a different word for "round." One child suggested "over." So then the students holding the objects laid down on the floor while other students sang:

Sally go over the sun,
Sally go over the moon,
Sally go over the chimney pot
every afternoon--boom!

 One student correctly identified "round" and "over" as a preposition! If we had more time, we would have done more playing around with changing out prepositions.

Making the Map

Students then sat in their circles and I reminded them of two weeks ago when we all followed the Harry Potter music map. I told them today they would be creating a map kind of like that using "Sally Go Round the Sun."

Each student received a whiteboard to write on, a piece of paper, and a marker. I showed them how to draw an 'X' in the top left corner of their paper--this is where their map would begin. They would start their map there and then would move their marker continuously on the paper until the song ended. We practiced once with tracing our finger and then did the real thing. Later on, the students traced their maps and then added in pictures of the sun, the moon, and the chimney pot in accordance to where they happened in the song. Here are some examples of what the kids came up with:


Switch-er-roo

Next the students were to swap papers with their neighbors and would trace their neighbors' maps. This was a lesson for me. I instructed the students to pass their papers one person to the right. This was much more of a difficult task than I anticipated it would be: I learned to always make sure everyone knows which way is right to begin with. :) Eventually the kids were able to trace another map besides their own!


Conclusion:

The students learned a new song, did movement to the song, and then created a music map for it. Creating the map required that they listened to the general melody and shape of the melody. We briefly talked as a class how the maps they made were different from one another. Although all the students heard the same song being sung, different people interpret and visualize music differently--in a way that makes the most sense to them.


Friday, October 6, 2017

M&Ms: Math & Music

Lesson #4: Addition, Body Percussion, & Instruments

Today at Spanish Oaks Elementary we began with reviewing 4-digit addition. I wrote three math problems on the board, and the students solved these problems in their math notebooks. For each problem, a student came to the white board and showed how he or she had solved the problem. 

Then I asked for the students' help to identify the:
  • thousands column
  • hundreds column
  • tens column
  • ones column
As the students identified which column was which, I put a box around that column.

Each column, I explained, would be assigned a different body percussion. As now shown below:


In this way, the answer to every math problem becomes a kind of song or composition. This one would consist of 3 snaps, 2 claps, 1 pat, and 6 stomps. I modeled how this should be done--keeping an even beat and counting out loud while we snapped/clapped/patted/stomped.

After the kids got the hang of this, we then performed the whole equation (1862 + 1354 = 3216) with the same body percussion as before.


Group Activity:

Next the class was split into four groups. Each group was assigned a different addition problem to first solve and then to practice as a group to soon perform in front of the class. They did this!


Body Percussion to Instruments:

I then erased the snaps/claps/pats/stomps markings I had written on the whiteboard and replaced them with these words: claves, triangles, sand blocks, and Chinese balls. What do these words all have in common? They are all percussion instruments!

The instruments were handed out to all of the students (they got to play their instruments as much as they liked while this was going on). After going over rules about the instruments, I explained how now each column would be played by one specific instrument. To simplify things, on the whiteboard I drew symbols that represented each of the instruments (clave=stars, triangles=circles, sand blocks=squares, Chinese balls=hearts).

We then played the equations using our instruments!


It was a fun time!

Music Standards Met:

3.M.P.8; 3.M.P.11

Sunday, October 1, 2017

Music Mapping

 Lesson #3: A Music Map!

This week at Spanish Oaks elementary we began exploring music maps!
For our first activity, I showed the class I drawing I had done of my neighborhood. I pointed out places in my neighborhood that were important to me and that I had put little stars next to (my house, my friends' house, my church). The students then had about five minutes to create a map of their own neighborhood.

Class Discussion:

Then as a class we talked about some of the purposes of a map. Some of the things we came up with were:
  • Maps show others where to go (could help a friend get to my house)
  • Maps have symbols on them that represent something (little boxes represent houses, stores, and so forth)
  • Maps show distance (e.g., how far away my house is from the neighborhood park)
  • Maps aren't always 100% accurate--they are interpretations
  • Maps show a specific place or location (or a specific neighborhood)
The students' maps were all unique and creative in their own way. Here is just a couple of them!


The Music Map:

Next I hung up on the board what is called a music map. This map "maps" out a song--using symbols, lines, and shapes to depict the different melodies throughout the song. I stood by the music map and as the song played, I traced my finger along each of the lines and symbols. The class was silent during this process! 

The song we used is from the movie soundtrack "Harry Potter and the Chamber of Secrets." (I chose this song and created this map in mind of this class--their classroom decoration has a Harry Potter theme.) Here is a link to the song as well as a close-up picture of the music map itself. 


Then I invited the kids to all put their fingers in the air and trace along with me.

Next I asked what the kids noticed about this map. Many students shared musical insights that they had noticed while listening and watching the map.

Some of their observations included:

  • The map followed the melody in the song
  • Symbols/lines in the map showed if sounds were short/long, slow/fast, and soft/loud
  • Some parts were repeated in the song
  • Lines showed whether the melody went up or down

Tie-In:

At this point, we revisited the class discussion we had earlier about the purposes of map. We talked about how this music map, although visually looks different than the neighborhood maps they drew, has the same functions as a regular map.

Music maps also can:
  • Show a listener where the melody goes throughout a song
  • Contain symbols that represent sounds, timbres, dynamics, tempos, and melodies
  • Show distance (how far away different themes in the song are from one another)
  • Are not 100% accurate--are interpretations!
  • Show a specific song (using this map with another song would not be effective)
For the last activity, we listened to the song again and the kids were told to stand up and to use their bodies to follow along with what the music was doing (instead of just tracing with their finger). I traced for them and they did some movement (some of which was quite entertaining to watch)!

Music Standards Met:

3.M.P.5; 3.M.R.1


Saturday, September 23, 2017

Water Glass Music-Making

Lesson #2: Using the Scientific Process


With my second week at Spanish Oaks Elementary, we used the scientific process to answer a question about the pitches these water glasses would make!


1. The Scientific Process

All students received a handout that listed the steps within the scientific process. Together as a class we went through each of the steps:
  • Purpose/Question
  • Research
  • Hypothesis
  • Experiment
  • Data/Analysis
  • Conclusion
Our scientific experiment involved the five water glasses shown above. Each of the identical glasses are filled up with different amounts of water (with food coloring). The students were asked to make a hypothesis about if all the glasses would make the same pitch when hit by a metal spoon. If they thought the glasses would make different pitches, then which glass would create the highest pitch and which glass would create the lowest pitch.

After experimenting, the kids made the conclusion that the blue glass (that contained the most water) made the lowest pitch, and the purple glass (which contained the least amount of water) made the highest pitch.

2. Further Experimenting/ Music-Making


Next I used the water glasses and a spoon to play a melody for the kids. They each raised their hands when they recognized which song it was (Mary Had a Little Lamb). These glasses form an E Major scale (do, re, mi, fa, & sol). I added another tiny glass which then became 'la.' Then each student got a turn to come up and help play a common children's song (while they rest of the class listened and guessed which song it was). 

Because of the setup of the glasses, each student knew it was their turn to play when I lightly tapped the top of their head (which I did with student permission). We played through several songs: Mary Had a Little Lamb; Twinkle, Twinkle, Little Star; It's Raining, and London Bridge is Falling Down (the latter being the trickiest for the kids to recognize). 


This was a fun activity that caused the students to think, listen, and participate! We could have spent many more minutes playing around with our little water-glass-ensemble!

Music Standards Met: 

3.M.P.11

Side Note:

The students thought I was so cool because I went around the room and listed off all of their names (which I had memorized using the class roster).
                                             #ProudTeacherMoment


Saturday, September 16, 2017

Music + Grammar


Lesson #1: Recognizing Verbs,   Adjectives, and Nouns 


This marks a new semester! I am now teaching at Spanish Oaks Elementary in a fun classroom of third graders. After a short getting-to-know-you activity, here it what we did!


Opening Activity:


First we all learned the first verse of the simple song "Buffalo Gals."


Then we added movement/actions that illustrated individual words in the song. Words like: "walking," "street," "gal," "see," "buffalo gals," "dance,' and "moon" to name a few. I suggested actions for the first half of the song, and the students enthusiastically created actions for the second half. We performed the song several times with all these actions!


Application Time:


For the application part of the lesson, the students returned to their desk and helped me write the lyrics to the songs on the whiteboard. Then I asked students to raise their hands and tell me which words involved "doing something." The kids supplied the answers, I underlined them in a different color, and then pointed out that these words are VERBS.

Next I did the same thing with all of the NOUNS and then ADJECTIVES in the song. 

Then we returned back to our standing circle and performed the song again. But this time, the students were instructed to only do the actions for the verbs and to omit the other actions. It was easy for the students (and me) to get carried away and do all of the actions unless we were really thinking!

Lastly, we returned to looking at the lyrics on the whiteboard. I erased a verb here, an adjective there, a noun there--leaving the underlined colors that showed what kind of word it had been. Then the students suggested words to go in those blank places--creating different lyrics. We then sang this version as a class one last time!


Music Standards Met:

3.M.P.10; 3.M.CR.2